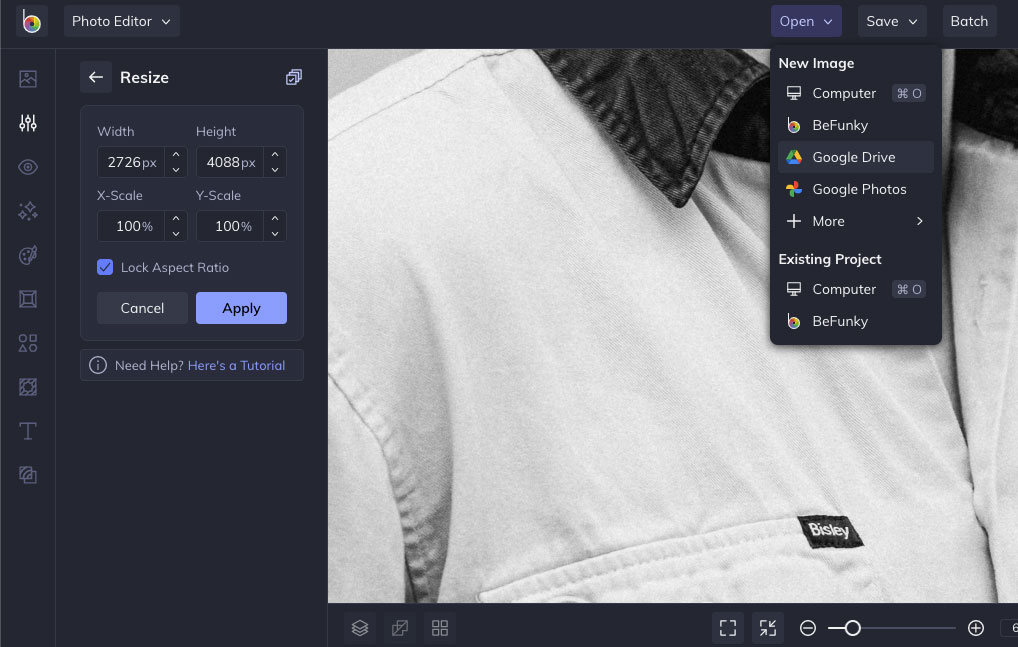
Google Drive is our easy option when it comes to sharing files — be it for personal or work team collaboration. And it’s easy to see why. Aside from the fact that it’s free, it got a plethora of apps you can use to even supercharge your workflow and save your time in the process.

One of those Google Drive apps that I stumbled upon is BeFunky Photo Editor. If you live in a country where internet is an issue (read: slow, expensive, and often capped internet), BeFunky Photo Editor will do you a favor.

Few days ago while finishing a customer’s website, a client shared a Google Driver folder containing a bunch of images to load up into his landing pages. The problem: the images came straight from a DSLR camera and were almost 30mb each. And we’re talking about 70-100 images.

Imagine the frustration I felt realising I had to download them all using my capped internet data so I can crop, resize them offline. I only needed at least 1200px wide versions of those images.

5 Handy Google Sheet Tricks To Help You Work Fast & Save Time

Just as you can unzip files on Google Drive without downloading them, there has to have a way to also crop, resize images straight from Google Drive without downloading them for offline editing. So I ended up rummaging through Google Drive apps directory and discovered BeFunky Photo Editor.

Easily Crop, Resize Images on Google Drive without Downloading them

google drive crop resize images

BeFunky Photo Editor is a top-rated photo editor on Google Workplace Marketplace with 4k+ users as of writing. It’s one decent, full-featured photo editor that works straight from your browser. Probably the biggest strength of this app is the simplified editing controls, making it easy to edit photos with a few click.

BeFunky is a uniquely powerful online and mobile photo editor. Think Photoshop, but simplified for everyday users. With BeFunky, you can easily create stunning, professional-quality images with a single click. The process might be simple, but the results are incredibly sophisticated. Thanks to BeFunky, there’s no need to choose between a powerful, do-it-all tool and an easy, user-friendly interface. We’ve got it all!

Here’s how to get started:

  1. Navigate to your Google Drive folder

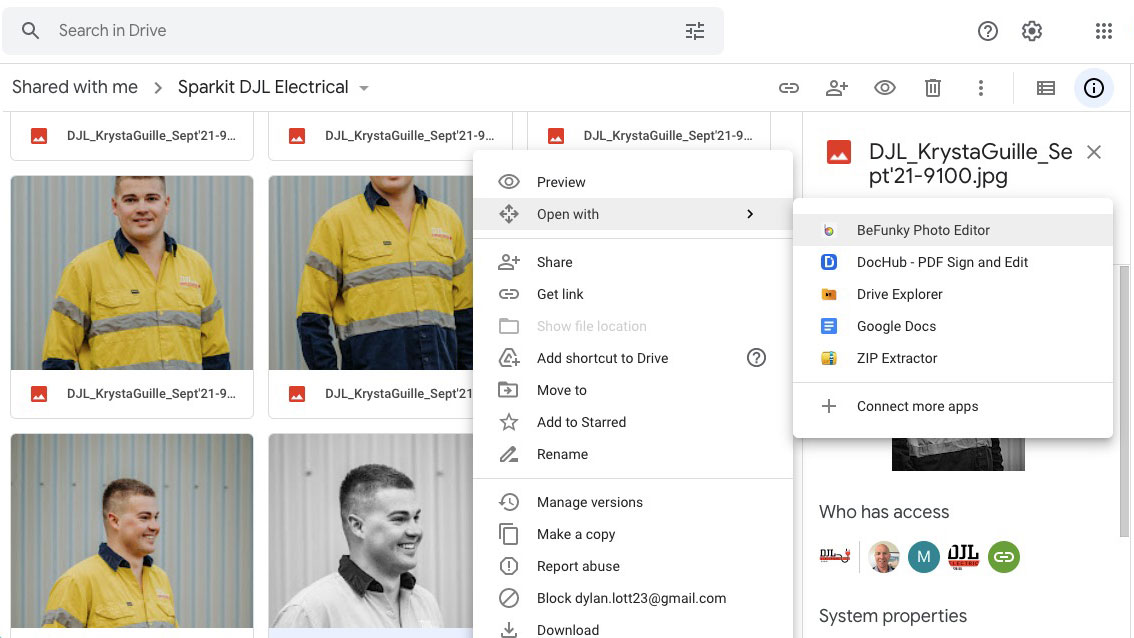
  2. Right-click any image > Open with > Connect more apps. This will bring the Google Workplace Marketplace popup

    befunky photo editor google workplace marketplace

  3. Search for “BeFunky Photo Editor” and install

  4. Once installed, follow the on-screen prompts to authenticate the app to manage your Google Drive files

Once done, you’re good to go. Just navigate back to your Google Drive folder and refresh. You should be able to right-click any image and open with BeFunky Photo Editor.

crop resize google drive images

While BeFunky got all the image editing tools you’re familiar with from desktop apps like Photoshop, I specially like the crop/resize feature and support for Google Drive to quickly import, resize, and crop Google Drive images.

How To: Extract All Images Embedded In .DOC Word Documents All At Once

And if you need fancier editing experience like text and graphics overlays for your ad banners perhaps or social media stuff, BeFunky got you covered. How cool is that?

Go check out BeFunky Photo Editor.
Quickly Crop, Resize Images on Google Drive - No Download Required

Few days ago, I was confronted with this situation where I needed to get a specific file within a zip file shared to me on DropBox. The trouble is, the archive file is over 2GB in size and I am on a limited internet data connection and I can’t afford to waste time downloading the entire 2GB file just to get a specific file for my web project.

Such dilemma would’ve been not a problem if, and only if, DropBox has a built-in file management system where you can zip or unzip files in DropBox website. However, as you might already know, DropBox web app is still deprived of such functionality. And there are no DropBox App Extensions that can do basic archive file management.

So normally your only way out is to download the entire ZIP file on your local drive and do the actual unzipping on your machine, which sounds very much unacceptably antiquated.

Because 2GB of data would cost me $5 in my country to download (and $5 is not cheap), I had to find a way how to unzip DropBox files without downloading them first. Thankfully, I found a way out, albeit not the most straight-forward. And this article, I’m going to show you how.

What you need

  • DropBox account
  • Google Drive account
  • Otixo account (or other free cloud file management apps)

Cutting off the crap, this method works this way: using Otixo service, we remotely copy those zip files from DropBox to Google Drive. And once those zip files are transferred to Google Drive, you can unzip them straight from Google Drive website.

How to unzip Dropbox files without downloading them first offline

For the purpose of this tutorial, I'm going to use a demo file globe-at-home.zip which sits right inside my DropBox account

  1. You’ll have to signup or login first to Otixo and connect your DropBox and Google Drive cloud accounts. Otixo has a decent file management functionality where you can connect multiple cloud drives into a single interface so you can quickly manage your files from multiple sources. We wrote about it before, so go check it out.
  2. Once you’ve added both your DropBox and Google Drive accounts, copy your DropBox ZIP file to your Google Drive. The transfer should take in seconds.

  3. As soon as you hit the Copy button, the ZIP file should arrive on your Google Drive account.

  4. Now, you're ready to unzip the archive inside Google Drive. To do that, you'll have to add ZIP Extractor as add-on to your Google Drive. See our guide here.

    Once ZIP Extractor is added, you can open your archive file with ZIP Extractor, as seen below:

  5. And finally, selectively extract the contents within that ZIP file.

You're done!

Best & FREE Alternatives To Otixo To Manage Multiple Cloud Storage Accounts

ZIP Extractor will then automatically create a new folder containing all the extracted files within that folder where the original ZIP file is located.

Final Verdict

Being able to unzip files in DropBox isn't natively supported yet on DropBox web app. However, with a little bit of creativity, we can achieve the same feat by moving that ZIP file from DropBox to Google Drive and do the extraction in the latter. Well, thanks to Otixo.

How To Unzip Archived Files in DropBox without Downloading them Offline

Have you ever been in a situation where you wished you could get a simplified list of Google Drive files and folders in a Google Sheet?

If you’re working as a graphic designer or web developer, chances are you’ve probably gone through that occasion where you needed to juggle through multiples files and folders just to get the file you want.

Google Drive’s built-in file explorer isn’t that intuitive enough. Rummaging through hundreds of files can be too overwhelming, to say the least. Well right now, not anymore!

How To List All Google Drive Files & Folders in Google Sheet

Meet Drive Explorer, it’s a tiny little add-on for Google Sheet that lets you export all (or selected) files and folders into a much readable spreadsheet format.

Drive Explorer (formerly Drive Direct Links) lets you pick folders/files from your Google Drive, Shared Drive or the files shared with you to export to the Google Sheet. Sheet columns contain metadata of the files like name of the file, containing folder, folder path on your Google drive, direct download link, etc.

How Drive Explorer works:

  1. You install the add-on and connect your Google account
  2. Once connected, go to your Driver folder and create a spreadsheet
  3. Inside your spreadsheet toolbar, click on Add-ons > Drive Explorer > Select files/folder.
  4. And finally, wait for a few seconds until your spreadsheet is automatically refreshed containing your files/folders’ meta info such as folder names, filenames, folder paths, links, etc.

When is it useful?

Being able to view your Google Drive files and folders in a list helps us save time and improve team collaboration. If you own an online store and works with VAs to manage inventories, this add-on definitely comes in handy.

In our day job, for instance, we constantly update images on our client’s websites. And our clients usually just share a large Drive folder containing all the images that need to be uploaded to their website. With Drive Explorer, we can now easily get a decent list of files in that shared folder so our team can easily collaborate rather than going back and forth on Google Drive.

5 Handy Google Sheet Tricks To Help You Work Fast & Save Time

Get A List of All Google Drive Files & Folders in Google Sheet

Google Forms, without a doubt, is still the best polls creation tool available to date. It's a free service from Google packed with all the essential features that make it tad easy to create quizzes or surveys on the fly.

While Google Form has all the components needed to create surveys real quick, it can be disappointing to note that the platform lacks the ability to collect users' inputs using the latter's language of choice. Google Form doesn't have multilingual support yet. However, as what the popular adage goes, there's always a way out.

In this article, we'll show you how you can easily create a single multilingual Google Form that prompts users their preferred language before finally asking survey questions. This is not a perfect solution but offers a neat workaround to collect users' info using their preferred language.

If you know a much better way, please buzz us off.

How To Create Single Multilingual Google Form

For the sake of this tutorial, we'll be re-creating this Demo Multilingual Google Form I previously built. Notice how it prompts you with preferred language before finally asking actual questions.

  1. First off, you'll need to go and create your first Google Form. Give your form a sensible name.

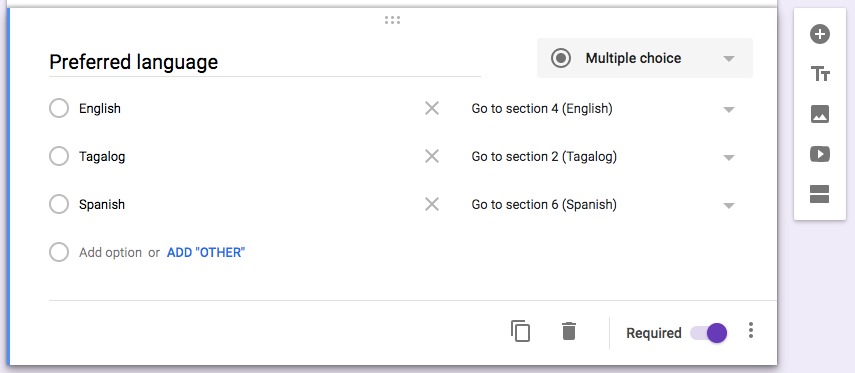
  2. Let's create your first question. Your first question should be of Multiple Choice type that asks users their preferred language. You can add as many language as you can.

  3. Let's add at least three sections. In this tutorial, we'll be supporting three languages, hence, the three sections. Google Form's section works like a group that lets you separate your poll questions.

  4. Each of this section holds the initial poll question from each supported language. So your three sections may look like these:

  5. Now, scroll up and navigate back to your first question (Preferred Language prompt). Click any of the options to bring the destination selection box. At this point, you can now instruct Google Form to jump to English section when English option is selected, Go to section X (Spanish) if Spanish is selected, and so on and so forth.

If you wish to create additional questions for each supported language, just add another three sections and redo steps three to five above.

All responses will be automatically stored in a Google Sheet, and each question and answer gets its own column in that sheet.

Extensis Fonts Lets You Access, Use Google Fonts In Your Google Documents

Creating a multilingual Google Form may not be as straight-forward as you might think. Until Google rolls out an update to their poll-creation platform, we can take refuge at the above method to add a multi-language support to Google Forms.

Create Single Multilingual Google Form and Display Questions Based on Selected Language

You probably have noticed that while inside Google Drive, one cannot easily extract nor preview zipped files straight from Drive's interface. Google Drive is still deprived of that native functionality and one has to manually download the entire archived file to obtain its contents.

I've been using Google Drive since its initial rollout. Although not my main virtual drive for backups, I use it primarily to store personal documents and some work-related files. And Google Drive being developed by Google gives you tight integrations with other G Apps.

And for occasions when you need to recover a file inside a large compressed ZIP file hosted on Google Drive, you better skip the hassle of manually downloading it yourself and just browse it on-the-fly.

Use Mover.io To Copy, Move Files From FTP To Google Drive, DropBox, SkyDrive and Vice Versa

Here we will show you a smarter way to unzip archived files and browse extracted straight from Google Drive.

Browse Contents Inside Zipped Files On Google Drive

The trick is easy. While you're on your Drive's folder, just right-click any zipped file and click on Connect more apps. Just search for “Zip Extractor”.

Once installed, refresh your Drive's page. You can right-click again the zip file and Google Drive now gives you the option to open it with Zip Extractor.

Zip Extractor will prompt you a one-time authorization request so it can do its thing. After that, you can unzip and browse zipped files with its neat interface. You can also selectively extract specific files inside a zipped file. Just uncheck

Another decent Drive app is Zip, Unzip App. Just like Zip Extractor, it lets you preview and browse zip files straight from Google Drive. What I like about Zip, Unzip App is that it quickly gives you a unique URL for each file found inside your zip file. The UI may need attention though but for a simple task of obtaining a specific file inside a ZIP file on Google Drive? I would go for Zip, Unzip App.

Conclusion

There you go! Google Drive definitely needs a lot of catching up when it comes to dealing with common file types like ZIP files. Being able to preview what's inside a zipped file is already a built-in feature in DropBox, but not in Google Drive.

How To: Browse, Extract Contents Inside Zipped Files in Google Drive