Previously on this blog we’ve talked about how we can use Google Sheet as Wayback Machine Internet Archive alternative to automatically capture web page screenshots. In that post, we’ve demonstrated how we can use screenshotmachine.com’s free API to generate a screenshot of website using Google Sheet script and store them in a dedicated Google Drive folder Web page captures.

It worked hitherto of course. The bad news is: the script suddenly stopped working, probably because of Google’s API changes or similar. But the good news is: there’s a good alternative to do just that for a minimal fee.

PageCapture: Automatically Capture Website Screenshots Daily, Weekly or Monthly

PageCapture is a nifty web app we discovered few days ago and we thought you’ll love it too. In a nutshell, PageCapture automatically creates a screenshot of any web page URL on schedule. There are a handful of capture frequencies to choose from: hourly, daily, weekly, monthly and even custom hourly intervals. You choose.

All screenshots are securely stored on PageCapture website. However, you have the option to sync it with your DropBox or Google Drive account. And if you’re a regular Slack user, PageCapture can automatically push all web page screenshots to your Slack account.

When is it useful?

Web masters and internet marketers will surely benefit such an automated screenshot-capturing tool. Web page screenshots act as visual backup which you can turn to when you want to recover something or just want to look back how your client’s sites look like in the past.

5 Handy Google Sheet Tricks To Help You Work Fast & Save Time

Or if you’re an internet marketer, you can use it to spy on your competitor’s website and monitor SERP positions on Google search results on daily or weekly basis.

While massively popular Wayback Machine is awesome, it only crawls public pages at unknown intervals; no daily or weekly snapshots. So it’s not that totally reliable if you want a simple visual snapshot of a web page daily.

Why PageCapture is awesome

Aside from the fact that you can automatically capture web page screenshot on schedule, there are also other advance options you can explore such as the ability to choose device screen size (e.g. desktop, iPhone, iPad) and user-agents. So, web masters will definitely find this useful too especially if you’re maintaining highly critical sites that requires constant monitoring.

Go check out PageCapture and don’t forget to share this to your friends who might need this.

How To: Automatically Capture Web Page Screenshots At Regular Intervals

A once popular blogging behemoth Tumblr will soon get a new home. It’s WordPress.

Automattic Inc, the maker of world’s most popular Content Management System, is currently in talks with Tumblr’s Verizon Communications Inc for potential acquisition as part of the latter’s media overhaul.

While no definite sum floats around the deal yet, one source familiar with the matter says it will be a “well below” $20 million deal.

Automattic Inc is said to rehome Tumblr’s 200 existing employees and vowed to maintain Tumblr’s existing porn ban.

Tumblr’s Early Years

Back in the days when no Facebook, Reddit, and Twitter yet, Tumblr used to be the go-to place for people who love to share online contents such as photos, music, videos, and blogs. The free service grew exponentially, with millions of daily active users soaked in addictive, user-generated contents hosted on their platform.

With a userbase that large, that got the attention of Yahoo, which acquired Tumblr for a whopping $1.1 billion under the helm of Marissa Mayer last 2013 until Verizon acquired Yahoo in 2017 for $4.8 billion.

Slack Desktop App Gets A Performance Boost — App Now Uses Less RAM, Loads A Lot Faster

WordPress.com To Acquire Tumblr for Less than $20 Million

Few days ago, I ran into a problem trying to access and update some of the web files inside a WordPress site.

The problem: I needed to access and update htaccess file but I only have /wp-admin/ account and there's no FTP or cPanel account given. Getting back to client and asking for FTP credential was not even an option, as he was already out during that time.

Normally, managing and editing files on a web server requires an FTP or cPanel account. Without a valid FTP or cPanel account, file management is impossible. But with WordPress, that's not the case.

How To Access Remote Web Files Without Using FTP Client

In this post, I'm going to show you a simple workaround on how to get an FTP-level type of access to your WordPress files so you can quickly manage and edit web files from your root directory using only a WP administrator account. This is rather a “dirty” trick and I discourage everyone to do this unless you've got an FTP account in hand.

Using WP-Admin Access To Upload, Edit Files Without FTP Account in WordPress

As you might already know, the real gem of WordPress comes from the thousands of ready-made plugins freely available for everyone. And here we're going to explore yet another awesome plugin called WP-FileManager.

WP-FileManager is a tiny WP plugin that gives you the ability to access and update files on your web server without an FTP account. Sounds like impossible but yes, you can use your wp-admin account to update and manage web files without FTP account.

Getting started with WP-FileManager

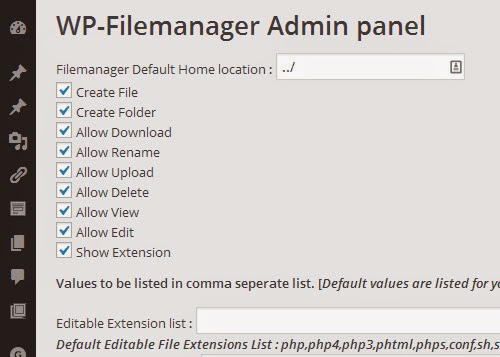
Just download and activate WP-FileManager from WordPress plugin repository. Once activated, you'll find a new tab called FileManager. Under this tab comes File Manager and Configuration. The plugins' default home directory is /wp-admin/ and it comes with all options disabled so you may need to go to Configuration first and set the default home directory and tick all the boxes, as shown below:


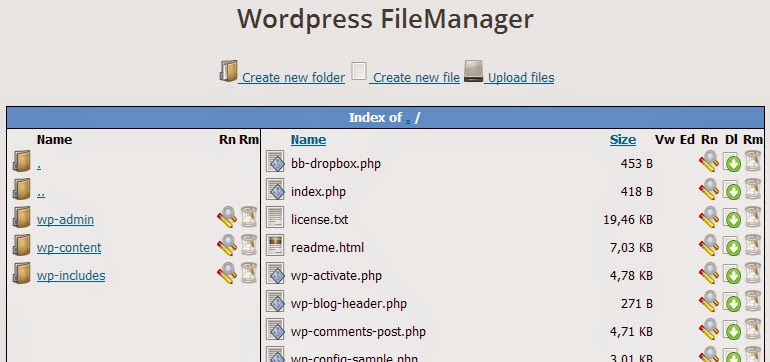
Once you've done this you can navigate back to FileManager and browse through files and folders.


How To: Automatically Generate Thumbnails, Screenshots For Any Website

WP-FileManager works almost like cPanel's file management system; you can browse through folders and root directory files, create new file or directory and upload files. The only downside: it won't let you edit files on the fly — you've got to download the file first, edit it on your computer, then re-upload it back to the server.

You're done!

As a final note, you only need to install WP-FileManager if and only if that's the last resort and you absolutely need it. Having WP-FileManager installed on your WP site gives everyone with admin account a full access to your web files, including wp-config.php file and htaccess.

How To: Upload, Edit Files Without FTP — Use WP-Admin Access To Manage Web Files (WordPress)

Whether you are a seasoned coder or a newbie dabbler, you need a code snippets repository.

A code snippets repository is a place where you can keep a file of your own most-used codes so you can check back and copy the needed lines of codes without having to rebuild them from scratch. Code snippets will basically save you time when developing or administering a website as you no longer have to rewrite the codes to achieve the desired results.

For example, here's a tiny code snippet you can add in your .htaccess file to speed up your site:

Responsimulator: The Most Accurate, Reliable Web-Based iPhone, iPad Simulator Online

While there are already long standing, well-reputed code snippets storage sites freely available out there, there's not such an abundance of apps that can beautifully store and organize your code snippets similar to how GistBox works.

In this post, we're going to explore how GistBox can help you in becoming more productive and learn why you cannot stay away from it once you get your hands into it.

So, what is GistBox?

GistBox is another code repository service designed to make code snippet management a little less boring. GistBox uses GitHub's backend but it comes with its own advanced label and search functionality — the features which are missing in GitHub's Gist.

Use Mover.io To Copy, Move Files From FTP To Google Drive, DropBox, SkyDrive and Vice Versa

GistBox was designed to be a curated, personal snippet library – like long term memory for the practicing software engineer.

Here's a few reasons why GistBox is the best:

I like Gist, but it's too limited; it lacks of important functionality like being able to organize your code snippets via tags or labels. So here allow me to point out the notable goodness of GistBox.

Color-Coded Labels. You can create labels as much as you want and assign a color for each label. GistBox Labels works like categories, so for every code snippet you add you can organize it by language, project or purpose.


Advance Search. GistBox's search functionality is surprisingly amazing. If you like how Gmail's search works, then, you'll also love GistBox. With GistBox, you can search through the entire code snippet library or through specific labels.


Collaborate with a group. Another cool feature of GistBox is it's ability for you to create groups and share useful snippets among co-workers — great if you're working with a team.


Split Screen: Splits Your Web Browser into Multiple Resizable Windows

GistBox is lightweight, free and usable. And it's a must-have to all devs!
Still not convinced? Go, check out GistBox and see it for your self.

GistBox: The Best Place to Store, Organize Code Snippets and Pastes

To those looking for a FREE, decent file management web service with support for FTP to copy, backup web files from web server to cloud storage providers (e.g. DropBox, Google Drive, SkyDrive, etc), well, then, this post if for you!

I am sometimes asked, as a web ninja, to create a full site backup of my client's sites and copy it to their cloud storage accounts. Such tasks can actually be a accomplished using the right (premium) tools or plugins. But sometimes, plugins just ain't enough! So you sit with a sheer frustration realizing that the only way out is to 'manually' grab those downloadables and upload them back to their online virtual drive. And yes, it's not an option; it's a waste of time!

Copy Files Between FTP, Dropbox, Google Drive & SkyDrive With Mover.io (link)

Meet Mover.io, yet another awesome web platform to move/transfer files from one cloud storage provider to another. Mover was created to streamline the process of transferring your data to the cloud. The service is sort of like that of Otixo, or the time-saving cloud storage managers we have previously mentioned here, which allows you to conveniently copy/move files between DropBox, Box, Google Drive, etc. 

But, Mover is Unique

What Mover sets apart from the rest is the intuitive support for FTP as your source or destination drive. And that's very useful feature among web guys who might need to backup their web files if BackupBuddy (or the equivalent add-on) is not an option.

Using the App:

It takes just a few clicks to kick off your transfers with Mover — just a one-time signup is required. But you have to complete your registration and login until you're greeted with their neat homepage:

Click to enlarge

All it asks is the source & destination drives, and the authentication required for Mover to basically talk to DropBox, Google Drive, SkyDrive, or Box. If you are copying files between FTP server to DropBox (like my example below), you may need to ask for your FTP host, username & password, and you're good to go!

In my example below, I was trying to backup all my web files under /backupbuddy_backups/ directory and copy it to my DropBox folder named /Backupbuddy/. In this case, FTP is the "source" and DropBox is the "destination"

Click to enlarge

As soon as you hit that big “Transfer Now” button, your transfer is now being queued and Mover should redirect you to the Activity page detailing the progress of your transfer.

Click to enlarge

Link: Mover.io

Use Mover.io To Copy, Move Files From FTP To Google Drive, DropBox, SkyDrive and Vice Versa

So you have this rare need of recording your voice; you might want to send a voice instruction to someone or you just want to record your own voice while humming your favorite song.

Well, the good news is you don't have to install another third party audio recording software just to get the job done. All you need is a web browser and a functional microphone attached on your laptop or desktop computer -- and you're done!

Prezi: Create Visually Engaging, Rich Media Presentations, Slideshows Online FREE

For students, teachers, and other professionals who want to do some audio recording but don't want to install another software, here's a shortlist of 5 FREE web-based audio recording software to record your voice online:

5 FREE Web-based Audio Recording Software To Record Audio Online

1. SoundCloud – allows you to do voice recording or to upload a recording to share with others. Once you are done recording, you can e-mail it and share with others. You can even make podcast more interesting by liking the audios or adding comments. [Link: Soundcloud]

2. Vocaroo – a tool to easily record your voice and then share it with others via e-mail, Facebook, Twitter, or embed the audio on your blog or website. The tool allows you to upload in different audio formats that you can all share. You do not even need to sign up for this tool. [Link: Vocaroo]

3. AudioPal – another tool that needs no signing up just to record your voice. Like the other apps, you can create as many audio messages as you need, share them with others, or embed them in your blog, website, or social media site. This works particularly well as a teaching tool because of its 6-second time limit. [Link: AudioPal]


4. Chirbit – a great tool that allows you to do voice recording and be able to share it in different social media sites. In addition, it allows you to upload different sound formats, or extract audio from YouTube videos. [Link: Chirbit]


5. Audioboo – recording app that works on iPhone, Android, and Nokia devices. You can also record through the web. Windows Mobile and Blackberry will soon be added. After downloading the app, all you need to do is start using the record button on the front page. Then, you can add a title, some tags, a picture, and even pick the location where it was recorded. The free download has a 3-minute limit on recordings. The app is even more powerful if you register online and fill out your profile. You can follow other people with Audioboo and listen to their uploaded boos. You can even link your recorded boos on other social media platforms, automatically. [Link: Audioboo]

Docracy: Your One-Stop Repository for Free, Open Source Legal Document Templates

Top 5 Free Web-based Audio Recording Software to Record Your Voice Online

When you own an active blog or website, you always love to read and reply to your reader’s comments. However, in the blogging world, comments left behind continue to be in text format and can be seemingly impersonal. Even email, website, or social media comments still feel impersonal using the usual text formats.

Now, you can allow audio feedback with the new SpeakPipe. Hearing the actual voiced comments from someone adds a personal touch to comments for any blog or website.

Learn How To Automatically Generate Thumbnails, Screenshots For Any Website

At present, anyone can leave voicemail podcasts attachments. However, telephone podcasting quality is very poor. Another method is to record audio attachments. This means, recording, saving, editing, encoding, attaching, and sending. Both of the above is not convenient for any user.

Listen To Your Website Visitors, Customers or Readers With SpeakPipe (link)

SpeakPipe is like your personal web voicemail directly accessible from your site. Your visitors can then leave high quality audio comments for you with just a few clicks. When you download and then install SpeakPipe’s box on your blog, your readers can now instantly send voice messages instead of the traditional plain text.


In short, anyone with a microphone and a computer can leave any kind of audio feedback or message without much technical fuss and trouble. They can even listen to their recording, edit, or redo it before sending.

When a message is sent, you then receive an email notice with an Mp3 download link. The sender has the option to leave a name and email address. This will show up on the SpeakPipe inbox.

Split, Paginate Long Blog Post In WordPress, Blogger/Blogspot, and Tumblr

SpeakPipe is entirely JavaScript-based so it is compatible with Android and iOS devices (iPhone, iPod Touch, and iPad).

Its little drawback is that, while the initial download is free, it has a time limit, and that means you need to purchase the full version. However, you get a refund after using it for 120 days and not being satisfied with it. Other minor issues include email notifications do not include the name and email address of the messenger, only one inbox, and there are no sorting options like folders or labels.

Create Contact Forms For WordPress, Blogger, Tumblr, etc.

Overall, SpeakPipe is still good to use and worth the time to try out for testing on you website or blog.

SpeakPipe: Let Your Visitors Leave Voice Messages -- for Wordpress and Blogger

With the internet so open to anyone, it is no surprise that copyright infringement and other content theft is rising fast. The best protection you can give to all your online images is to embed photo watermarks online to personalize and thereby, clearly identify all your image files.

Basically, according to the FreeDictionary.com and Dictionary.com, a watermark on any picture simply means:
"The faint design made on paper during manufacture, that is visible when held against the light and typically identifies the maker."
The best example for a watermark are those found on Australian dollar bills and South Korean Won bills.

Create, Add Links To Already Uploaded Videos On YouTube

Traditionally, watermarks are added by embedding a custom text or tile into the image using photo-editing software like Adobe Photoshop. But no, you don't have to go through the same old process of watermarking your photos this time. There is this awesome online photo watermark creator that can surely save you time when watermarking your photos online.

Picmarkr: Free Online Photo Watermark Creator To Watermark Your Images Without Using Photoshop (link)

With Picmarkr Free Online Photo Watermark Creator, you can easily watermark your online images for free.

In using Picmarkr.com, there are simply three very easy steps to follow:

1 Upload images or photos of your choice Upload any picture or image of your choice from your Facebook account, you blog, flickr.com, or Picasa.com. Then, using the Picmarkr Watermark Creator, you can upload and watermark up to five images at once. You can even resize your pictures as you see fit, from 500 up to 1024 pixels.


2 Select a Watermark Format You have a choice from the three popular formats, text, image, or tiled watermarks.


3 Download the Watermarked Images After selecting the watermark format you want, the watermarked image should be ready for downloading.

Extract All Images Embedded In .DOC Word Documents All At Once

Picmarkr.com can also be used to add watermarks to images without using software that are stored in a PC or laptop.

How To: Create, Add Watermark to Your Photos Without Using Photoshop

Android evangelist Zen is quick to suggest that I should've had QR images added to all iPhone & Android downloadables featured here. According to him, users will find it easier to access those mobile goodies if they can just point their camera down to every QR code, and let the phone do the magic.

And yes he's right; you want to give the best possible user experience from your blog, right?

DynoTag: A New QR Tagging Service That Helps You Find Your Lost Stuff

If you're wondering about how to dynamically generate QR codes for any given URL or web page, you might want to check out this cool QR Code API generator courtesy of Tag.cx.

Easiest Way To Dynamically Generate QR Codes Via JavaScript

Tag.cx QR Code Generator is a tiny JavaScript library that lets you programatically generate QR Codes for any given web link. Generating QR Codes using their API is a snap. Just copy and paste below JS lines anywhere on your blog post and it will magically display a QR Code image  pointing to the page.

<script src="http://www.tag.cx/qr-codes/tag-cx-qrcode.js" type="text/javascript"/>
<script type="text/javascript">
generateQRCODE("qr","150","http://www.rushlywritten.com");
</script>

The above script calls a function generateQRCODE() which will automatically generate a QR Code image for rushlywritten.com. Now mobile phones can easily bookmark your webpage, just by taking a picture of the image generated by this script. For a complete implementation instruction, head over here.

Learn How To Automatically Generate Thumbnails, Screenshots For Any Website

Tag.cx' QR Code generation service is a complete clean-cut if you want to programatically generate QR codes for any given website. Just a few lines of scripts, you'll see the QR code magically sits there.

You might not need Tag.cx' QR Code Generator right now, but it's a good site to bookmark for the future when you do.

QR code image for Tag.cx:

Dynamically Create, Generate QR Codes For Download Links, URLs

One of the most important things every blog owner should do is to perform a complete database backup on regular basis. Doing so does not only afford you the peace of mind but it also gives you the confidence that you can anytime restore your blog in the event of cyber attacks.

Performing database backup is easy; it's just a matter of exporting all your data into a single SQL file. And if you're using WordPress, the task is even a lot easier.

How To Split, Paginate Long Blog Post On WordPress, Tumblr, Blogger

In this post I'm going to introduce you to another awesome WordPress database backup plugin. This time we're going to backup our WordPress database straight to DropBox.

Automatically Backup Your WordPress Blog To DropBox


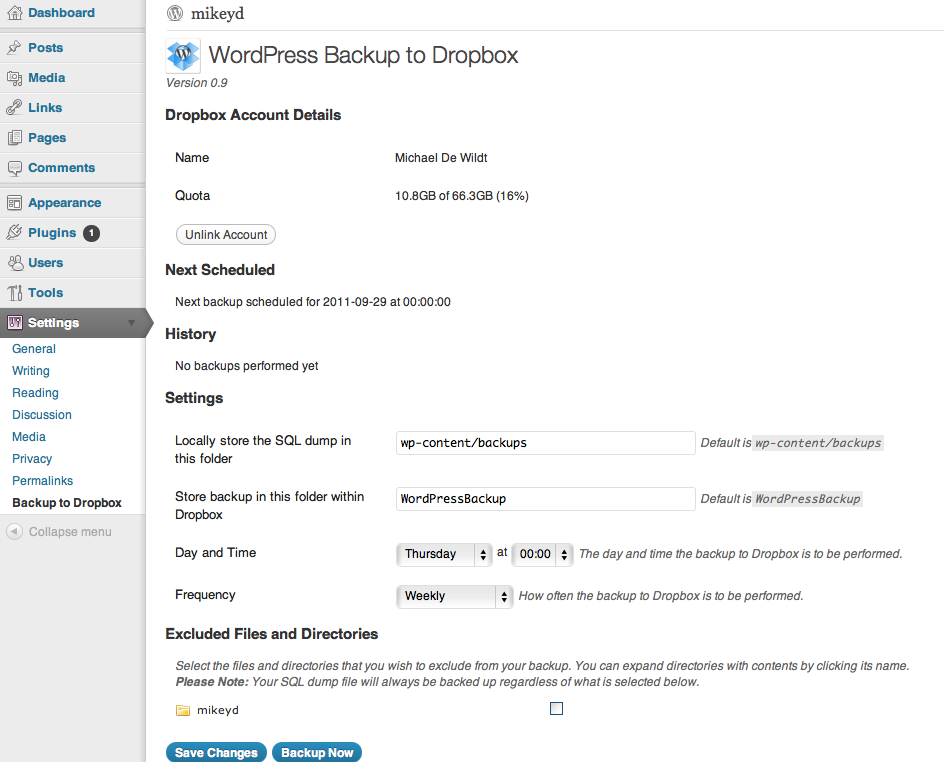
WordPress Backup to Dropbox (link) is a wonderful creation of Michael Dewildt that gives you the peace of mind you deserve. Just choose a day, time and how often you wish your backup to be performed and sit back and wait for your websites files and a SQL dump of its database to be dropped in your Dropbox!

Follow this 4 easy steps on how to backup your WordPress blog to DropBox.

Step 1 Download and install WordPress Backup to DropBox. Activate it.

Step 2 Authorize the plugin to connect to your Dropbox account.

Step 3 A new window should open where Dropbox will ask you to authenticate in order to allow the plugin access to your Dropbox.

Step 4 Once you have granted access to the plugin click continue to setup your backup.


Free Video Chat Plugin For WordPress That Works Like Skype

You can set where you want your backup stored within Dropbox and on your server as well as choose what files or directories, if any, you wish to exclude from the backup.

How To: Backup WordPress Blog Database And Auto Send It To DropBox

I received a tutorial request from my reader that asked me how to paginate or split a very long blog post in WordPress, Blogger or Tumblr. So here I’m going to show you a simple workaround on how to split that long blog posts into multiple pages in your WordPress, Blogger or Tumblr blog.

Split, Paginate Long Blog Posts In WordPress, Blogger and Tumbler

Splitter for WordPress - Splits Long Posts Into Pages

Splitting a long blog post into pages has never been this easier with Splitter. Splitter is a plugin for WordPress that splits your blog post into multiple pages by automatically adding ‘nextpage’ while maintaining the validity of your HTML. Paginating or splitting your blog post in WordPress with Splitter is very simple. Here’s how:

Tip: Learn How To Auto Generate Website Thumbnails, Screenshots In WordPress

Step 1 Install and activate Splitter for WordPress here. Or you can search for "Splitter" at WordPress plugin directory site.

Step 2 Once installed, you should see Splitter below your WordPress text editor (see screenshot below). There you can specify a maximum number of characters per page.


Splitting long blog posts in WordPress is really that easy! Here's the final look (of course, you can customize the pagination links/buttons):


Pages: 1 2 3

How To: Split, Paginate Long Blog Post In WordPress, Blogger/Blogspot, and Tumblr

True to the words of many, the real power of WordPress comes from the thousands of plugins available for free and at a decent cost. Plugins are the real gem of WordPress; they simplify the creation of complex functionality to your WordPress site at no extra cost.

And talking about plugins, our brilliant team of plugin makers have never forgotten to create a voice chat solution you can integrate in your website. Here I am going to share you another awesome VOIP solution for WordPress that works like Skype. This voice chat plugin for WordPress is free, requires no coding, and is ideally recommended for anyone who wants to talk or engage with their readers directly on a website.

Free Web Conferencing Tool, Voice Chat Plugin For WordPress

If you haven't heard about OpenTok yet, it is a video chat platform that enables site owners to host live, group video conversations, online conferences for free. It is a flagship product of TokBox that simplifies the creation of robust, and multi-way video chat application for free. Think of OpenTok as a web version of Skype, where you can invite your readers for a live discussion directly on your website.

This free voice chat plugin for WordPress comes with incredible features such as:
  • Live Presence Indicator - notifies you of the number of individuals currently on your site
  • Quick "Start a Chat" button - accessible only to you as the admin
  • Ability to chat with 10 participants simultaneously while hundreds can watch
  • Full control over who stays and who must leave
  • Simple installation means your plugin is up and running in seconds
When do you need this?

OpenTok can be useful when you want to:
  • host live panels
  • interview relevant individuals
  • Q&A sessions with your readers
  • moderate hot topic discussions
  • make a public announcements/breaking news
OpenTok for WordPress is compatible with WP 3.2.1. And should you experience problem during installation, the team of TokBox is quick at taking your queries, so don't hesitate to ask them questions.

I like the simplicity of OpenTok, and if you're comfortable with web programming you can even get through the core and get a more customized web-based video chat app courtesy of OpenTok. Visit OpenTok for WordPress plugin page for more info.

Free Video Chat, VOIP Plugin for WordPress That Works Like Skype

If you enjoy blogging as much as I do, you should have recognized the importance of subscription links in your website. Your visitor who finds your post useful is most likely to subscribe and spread the word by sharing it to their friends. RSS subscription button and social bookmarking links play a vital role in gaining more traffics.

And if you want to expand your reach, you might want to try Google SMS Channels, a Beta service of Google which allows web visitors to instantly subscribe your blog via SMS. Your visitors will instantly get notified thru text message by the time you post a new content in your blog.
Google SMS Channel Subscribe

Setting up SMS subscription service using Google SMS Channels is easy. Follow this step-by-step guide on how to set up SMS subscription service for your blog:

Create awesome, secure Contact Us form for your blog

NOTE: Google SMS Channels is currently available in India, which means only visitors from India can subscrible your blog via SMS and only bloggers based in India can avail the service. But don't worry because the guys behind Google promised to make this SMS subscription service available worldwide very soon.

And just because you're outside India doesn't mean you can't let Indian visitors subscribe your blog via SMS. Here I will teach you also how to implement this cool SMS subscription service even if you're outside India.

Step 1 : Go to Google SMS Channels website and login using your Google Account.

Step 2: If you've successfully logged in, you should be taken to Google SMS Channel homepage where you can see a section 'Create your own channel' in the right sidebar. Now, click 'Try Now'.

Step 3: Enter your Indian mobile number. You should receive an SMS from Google with verification code.

Step 4: Enter the verification code and verify your mobile phone and click the 'Try Now ' link once again.

Step 5: Now, specify the name of the channel (e.g. WebTips), description, category, and location.

Step 6: Now provide your blog RSS/Atom or feed address. If you're using Blogger, you can choose to give your blogspot address.

Step 7: Check the 'Title' and optionally the 'Body' boxes if you want to send both the blogpost title and post body.

Step 8: Select 'Allow Publishing By ' as 'Only Me' and 'Who can subscribe' as 'Any User'.

Step 9: And finally, hit 'Create Channel'.
Your SMS Channel is now active and ready. Just append the generated link/script anywhere in your blog and your readers can now subscribe your blog via SMS.

Make your blogger, blogspot website mobile friendly

As promised, bloggers outside India can still implement this SMS subscription service. Try to connect to your Indian friends and ask them a little favor; ask their Indian mobile number, ask them to forwad back the verification code sent by Google, and proceed to Step 3. That's it.

Currently I'm still waiting for my Indian friends in Facebook for their replies...hopefully they'll cooperate. And if you can't wait, you can get an instant virtual Indian phone number, but it comes at a price.

SMS subscription service trully is a great addition to your blog. Loyal visitors can freely choose what type of notification they're most comfortable to deal with.

Wait for my update for I'm going to show you how to come up with your own SMS subscription service for your blog using PHP and free SMS gateway available in your country. Subscribe via email below.

Google SMS Channels: Let Visitors Subscribe Your Blog via SMS